With this blog post I want to provide an example webapp using Spring and AngularJS since both are very popular technologies. The webapp is created using Spring Initializr, Spring Boot and an example AngularJS project. It’s a step-by-step tutorial with some explanations. The repository can be found in this repository: https://github.com/seeebiii/SpringAngularExample.
Let’s start:
1. Create Initial Project
Create a new Java project using Spring Boot. You could either use Spring Initializr or the new project dialogs in your preferred IDE, e.g. IntelliJ IDEA supports Spring Initializr out of the box. Nonetheless the most important point is that you include dependencies to Spring Boot Web, JPA, JDBC and a database in your pom.xml. The following pom.xml includes these and the Spring Boot Maven plugin as well:
<?xml version="1.0" encoding="UTF-8"?>
<project xmlns="http://maven.apache.org/POM/4.0.0" xmlns:xsi="http://www.w3.org/2001/XMLSchema-instance"
         xsi:schemaLocation="http://maven.apache.org/POM/4.0.0 http://maven.apache.org/xsd/maven-4.0.0.xsd">

    <!-- Put some Maven configuration here -->

    <!-- It is important to add the boot starter parent! -->
    <parent>
        <groupId>org.springframework.boot</groupId>
        <artifactId>spring-boot-starter-parent</artifactId>
        <version>1.3.1.RELEASE</version>
        <relativePath/>
        <!-- lookup parent from repository -->
    </parent>

    <!-- Now define the dependencies to the other Spring boot projects -->
    <dependencies>
        <dependency>
            <groupId>org.springframework.boot</groupId>
            <artifactId>spring-boot-starter-data-jpa</artifactId>
        </dependency>
        <dependency>
            <groupId>org.springframework.boot</groupId>
            <artifactId>spring-boot-starter-jdbc</artifactId>
        </dependency>
        <dependency>
            <groupId>org.springframework.boot</groupId>
            <artifactId>spring-boot-starter-web</artifactId>
        </dependency>

        <dependency>
            <groupId>org.hsqldb</groupId>
            <artifactId>hsqldb</artifactId>
            <scope>runtime</scope>
        </dependency>
        <dependency>
            <groupId>org.springframework.boot</groupId>
            <artifactId>spring-boot-starter-test</artifactId>
            <scope>test</scope>
        </dependency>
    </dependencies>

    <!-- Optional: Add Spring Boot Maven Plugin to start your webapp with 'mvn spring-boot:run' -->
    <build>
        <plugins>
            <plugin>
                <groupId>org.springframework.boot</groupId>
                <artifactId>spring-boot-maven-plugin</artifactId>
            </plugin>
        </plugins>
    </build>

</project>
See the full example pom.xml here.
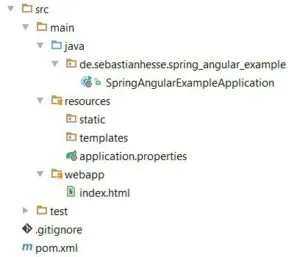
Your project folder should look like this after these steps:
Spring Initializr creates a default Application class to start your application. Here is an example and explanation for this default class: https://docs.spring.io/spring-boot/docs/current/reference/html/using-boot-using-springbootapplication-annotation.html
2. Check Your Webapp
As you can see on the project structure image, there is an index.html file available in the folder /webapp. This is a basic HTML file which I’ve created in order to do a smoke test, i.e. check if everything is working fine. Start a local webserver by running the main method of SpringAngularExampleApplication or by using the Spring Boot Maven Plugin with spring-boot:run. Both ways a Tomcat server is started if you don’t specify any specific webserver. Now try to reach your webapp by opening http://localhost:8080/index.html in your web browser. If you’ve put any content into your index.html, then this content should be shown after loading.
Tip: Use the webapp folder of your Java project and keep every HTML, CSS and JS files in there to update them without a server reload later.
3. Add AngularJS
Now you can add AngularJS related stuff. Doing it the easy way, you can create a single HTML file and include Angular and your own JavaScript. Example:
<!DOCTYPE html>
<html lang="en">
<head>
  <meta charset="UTF-8">
  <script src="https://ajax.googleapis.com/ajax/libs/angularjs/1.4.5/angular.js"></script>
  <script type="text/javascript">
    var app = angular.module('exampleApp', []);
  </script>
  <title>Spring Angular Example</title>
</head>
<body ng-app="exampleApp">

  My Spring Angular Example!
</body>
</html>
That’s it! We load Angular from Googles CDN and create an Angular module. The important lines 7 and 11 for this initialisation are marked. Now your webapp should work with Angular. You can try it by relaoding your browser at http://localhost:8080/index.html. Unfortunately we can’t see any action or feature using Angular, so let’s add Angulars routing mechanism:
<!DOCTYPE html>
<html lang="en">
<head>
  <meta charset="UTF-8">
  <script src="https://ajax.googleapis.com/ajax/libs/angularjs/1.4.5/angular.js"></script>
  <script src="https://ajax.googleapis.com/ajax/libs/angularjs/1.4.5/angular-route.js"></script>
  <script type="text/javascript">
    var app = angular.module('exampleApp', ['ngRoute']);
    app.config(['$routeProvider', function($routeProvider) {
      $routeProvider.when('/example', {
        templateUrl: 'example.html'
      });
    }]);
  </script>
  <title>Spring Angular Example</title>
</head>
<body ng-app="exampleApp">

  My Spring Angular Example!

  <a href="#/example">Click here to see Angular routes in action.</a>

  <div ng-view></div>
</body>
</html>
The routing mechanism uses HTML anchors for “navigation”. You have to add…
- line 6: a script tag to angular-route.js
- line 9-13: a configuration using $routeProvider and define the different routes and which template to load
- line 21: a link with the location pattern like ”#/DEFINED_ROUTE”
- line 23: a container marked with ng-view where the template content is loaded into
With this nice feature, you can create Single Page Apps very easily.
Tip: Take a look at Angular Seed @ Github and get a preconfigured Angular project for common use cases.
Tip: Use Node, Bower and other tools to automate and speed up your producitivity!
I hope this will help you to setup your next webapp project using Spring and Angular! Next time I will write about the combination of a Spring based backend and Angular frontend, i.e. how to communicate between both.

Related Articles

Using Spring Boot On AWS Lambda: Clever or Dumb?
Should you run Spring Boot on AWS Lambda? Detailed analysis of advantages, disadvantages, cold start impact, and GraalVM alternatives for Java serverless functions.
Deploy a Multi-Module Maven Project to Heroku
Deploy multi-module Maven projects to Heroku with Spring Boot. Use config variables and Procfile to manage multiple microservices from a single repository.
Handle URL parameters with AngularJS
Master AngularJS URL handling with $routeProvider and $routeParams. Learn path parameters, query parameters, and HTML5 pushState mode for clean URLs.
Use Jersey and Spring in AWS Lambda
Integrate Jersey and Spring Framework in AWS Lambda using aws-serverless-java-container. Complete guide with code examples for building REST APIs on Lambda with Java.